Join the 1 million+ independent landlords who rely on TurboTenant to create welcoming rental experiences.
No tricks or trials to worry about. So what’s the harm? Try it today!

You might have a good memory, but without a tenant move-in checklist, good luck remembering the condition of your property 1, 2, or 3 years after somebody moves out.
Imagine this scenario: Your tenant’s lease is up and he’s moving out. During the final walkthrough, you spot a massive grease stain on the carpet. When you deduct cleaning costs from his security deposit, he threatens to take you to small claims court, insisting the stain was there when he moved in.
Fortunately, you had the tenant complete a move-in inspection checklist to document any pre-existing damage before he moved in. And, when you review it, you see zero evidence of a grease stain. With clear documentation in hand, you have the proof needed to justify your cleaning charge. Nice try.
Without that checklist, you might’ve found yourself heading to court to dispute a baseless claim. But because you were proactive and used property management software to send the tenant a free condition report, you effectively protected yourself and your rental from his bogus allegations.
Keep reading to learn when to issue move-in checklists, which states require them, and how to create a free, customizable checklist to protect you from unfounded claims.
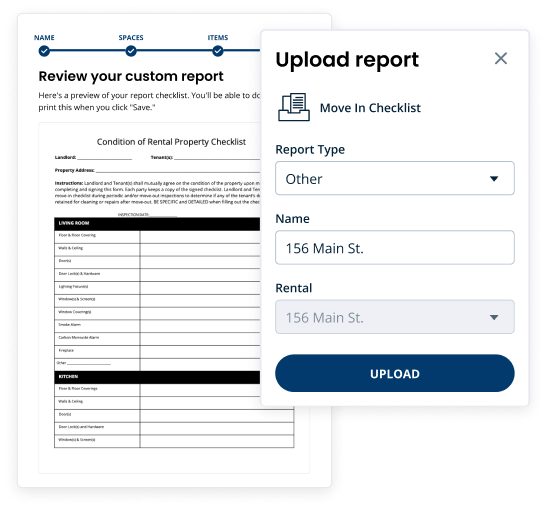
Customize your condition report. Send it to your tenants for e-signatures. Store it in your TurboTenant account to reuse and reference during move outs.
A move-in checklist is a document landlords issue tenants to detail a rental unit’s condition before a rental contract begins. This report allows tenants to record the state of the rental’s floors, walls, surfaces, appliances, and more.
They’re vital tools that help prevent future disputes between landlord and tenant, especially when a landlord makes deductions against a tenant’s security deposit to repair damage exceeding normal wear and tear during their stay in the rental unit.
Landlords gain protection against false claims that a tenant didn’t cause damage that occurred during their tenancy. Tenants, on the other hand, gain protection against unjust security deposit deductions.
Move-in condition reports are so important that 17 states legally require landlords to issue them before tenants sign a lease. Whether your state does or doesn’t require one, we highly recommend protecting your rental units against inaccurate damage claims with a move-in checklist condition report.
While the example above protected you, a move-in checklist would have protected him if his baseless claims were legitimate. These condition reports, much like lease agreements as a whole, work to protect both landlords and tenants.

As mentioned earlier, 17 U.S. states mandate move-in checklists, requiring both landlords and tenants to document the property’s condition before the lease’s start date. These states include:
While these states all have laws regarding condition reports, specific requirements vary between them. For instance, some states only require move-in checklists if a landlord collects a security deposit from the tenant.
For landlords in states without such laws, we still recommend issuing every one of your tenants a move-in checklist. The condition report process will help prevent disputes over property conditions and security deposits, thus protecting both you and your tenants.
Landlords should issue tenants move-in checklists a reasonable amount of time before the tenant moves into the rental property. Sometimes, the property manager and tenant will fill out the condition report together during the move-in walkthrough.
In other cases, landlords will ask that tenants complete a digital move-in report on their own time (within a predetermined time frame after the lease starts), either through a physical document or on their smartphone, which will allow them to add photos, write detailed descriptions, and rate the condition of specific areas within the rental unit.
To prevent potential disputes, landlords and tenants should be meticulous when completing and assessing move-in checklists. To exercise proper due diligence during the inspection process, focus on inspecting the following areas during all walkthroughs:
Flooring and carpets: For hardwood, laminate, tile, and vinyl floors, search for stains, cracks, and dents. When inspecting carpeting, search for discoloration, fraying, moisture, and grease stains.
Walls and ceilings: Check walls and ceilings for scuffs, cracks, peeling paint, or water stains that could indicate leaks. Keep your eye out for holes caused by nails, screws, or wall anchors from previous tenants.
Doors: Make sure all doors open and close properly without sticking or creaking. Test locks, doorknobs, and handles to ensure they function correctly. For rental units with sliding doors, check that the tracks are clean and that the doors glide smoothly.
Windows: Ensure that all windows open and close smoothly and that window locks work properly. Search for cracked or broken glass, condensation between double-pane windows, and missing screens.
Countertops: Inspect countertops for stains, cracks, burn marks, or water damage. Pay close attention to areas near sinks and dishwashers where water exposure is common.
Lighting and fixtures: Test all light fixtures to confirm that switches are responsive and bulbs function properly. Note any burnt-out bulbs, missing covers, or loose wiring that causes flickering. (Don’t forget to check any ceiling fan lights, too.)
Appliances: Test the stove, oven, refrigerator, dishwasher, microwave, washer/dryer, etc. Ensure everything is functioning, and look for signs of significant damage. Run the garbage disposal to confirm it works.
Plumbing: Test showers, faucets, and drains to check for leaks, low water pressure, or clogged drainage. Look for signs of water damage, mold, or loose pipes. Flush all toilets to ensure they function and the water doesn’t run indefinitely.
Electrical: Test all outlets (the easiest way is with a phone charger) to confirm that they deliver power. Keep your eye out for missing outlet covers, exposed wiring, or burn marks. Ensure all light switches work, and check that all carbon monoxide detectors and smoke alarms operate properly and have fresh batteries.
Exterior: Inspect balconies, patios, and entryways for cracks, peeling paint, adhesive residue, and other types of damage. Ensure that all exterior doors open and close properly and have working locks.

Your work is not done once you issue a tenant their move-in checklist. Here are the eight steps to take after giving your tenant a condition report:
Before your tenant moves in any of their belongings, schedule a walkthrough to give you and the renter a chance to inspect the empty property. During the process, ask the tenant to document any property damage and confirm that everything is in working order.
If a tenant is conducting their move-in condition report without you present, give them a reasonable time frame to inspect the property and report any issues. Landlords commonly require tenants to return condition reports within 48 to 72 hours after move-in.
Encourage tenants to document potential issues with photos, videos, and written descriptions. Doing so will add credibility to their claims, provide detailed evidence, and help you effectively assess and address any issues.
Photos, videos, and written descriptions will decrease the likelihood of disputes over the security deposits, as there is a smaller chance of becoming embroiled in a “he said, she said” battle.
After a tenant submits their move-in checklist, review it closely and compare it to your records. If you find discrepancies, address them immediately and work with the tenant to create a checklist you agree on.
Once both parties are happy with the move-in checklist, you and the tenant should sign the document to ensure it’s legally enforceable. You will reference the move-in checklist during move-out to identify any damage caused under the tenant’s watch.
If the tenant uncovers any critical issues during their move-in inspection, address them promptly and document the fixes in detail. Doing so will help safeguard your rental property if further damage occurs to the same areas you fixed after the move-in report.
As you should with any lease agreement, provide your tenant with a signed copy of their move-in condition report after you address any issues. Doing so will ensure both parties that move-out proceedings are fair and transparent.
After a tenant’s rental contract ends, compare the initial move-in report with the rental unit’s condition during move-out. Use it to identify any damage that occurred during a tenant’s residency, as doing so will help you justify any security deposit deductions.

Issuing a detailed tenant move-in checklist to document your property’s condition can save you a lot of stress.
Doing so will help protect yourself against false claims from unsavory tenants and give renters peace of mind that they won’t pay for damage they didn’t cause.
Our (free) move-in and move-out condition reports will allow you to:
Sign up for a free TurboTenant account now to start protecting your rental today.
On top of creating customizable condition reports, our cutting-edge rental property software can help landlords like you:
A move-in checklist helps landlords and tenants document a rental’s condition before the lease starts. It creates a clear record of any existing damage, protecting tenants from unfair charges and giving landlords proof if repairs are needed when the tenant moves out.
Follow these steps to complete the move-in check inspection process:
“Move-in ready” means a rental is clean, safe, and fully functional for a new tenant. Everything should be in working order (appliances, plumbing, heating, and electricity) without needing repairs. The landlord should also ensure that the rental unit is freshly cleaned and meets basic living standards.
Tenants and landlords should complete move-in checklists before the tenant moves in or within the first few days of the lease’s start date. Common practice among landlords is to give tenants 48 to 72 hours to document any issues and return the report.